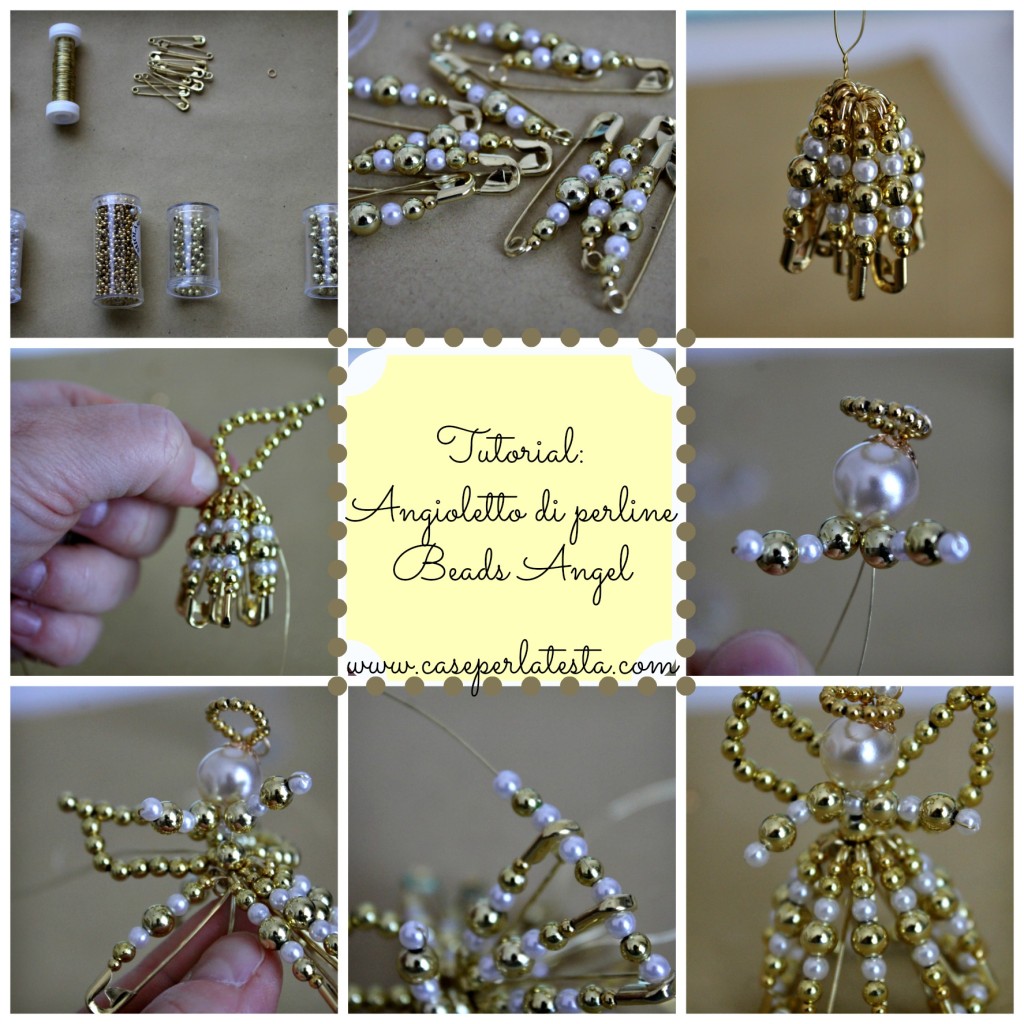
Finalmente ce l’abbiamo fatta! Abbiamo preparato un tutorial per fare gli angioletti di perline: siamo molto felici di poterlo condividere con voi! … e allora cosa aspettate? tutte a fare angioletti da mettere sull’albero di Natale, come segnaposto per la tavola di Natale, come regalo per una persona speciale: gli angioletti di perline sono così belli che ogni occasione è buona per metterli in mostra! Mettetevi comode questo sarà un post mooolto lungo!
Finally we made it! We have prepared a tutorial on how to make angels of beads: we are very happy to share it with you! … and then what are you waiting for? let’s all make angels to put on the Christmas tree, as a placeholder for the Christmas table, or as a gift for someone special: angels beads are so beautiful that every occasion is good to show them! Grab a cup of tea, this will be a very looooong post!
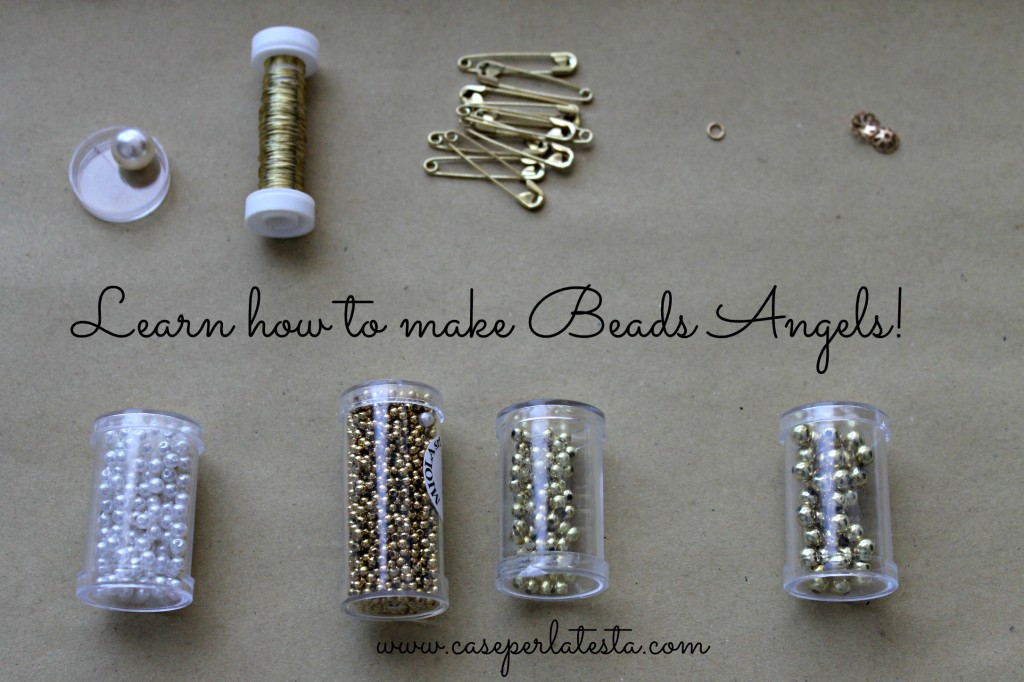
1 perla bianca 14 mm per la testa (0.055 inc)
1,5 m (59 inc) di filo di ferro color oro diametro 0,4 mm (0.015 inc)
10 spille da balia color oro circa 4 cm per il vestito, le puoi acquistare qui
1 anellino d’oro per appenderlo
1 chiudi collana in oro (cappellino)
1 campanella piccola (opzionale)
35 perle bianche 4 mm
24 perle oro 3 mm
16 perle oro 6 mm
76 perle oro 3 mm
Materials:
1 white pearl 14 mm (0.055 inc) for the head
1.5 m (59 inc) golden wire diameter 0.4 mm (0.015 inc)
10 safety pins gold color size 2 for the dress
1 gold ring for hanging
1 close necklace in gold (hat )
1 small bell (optional)
35 white pearls 4 mm (0.015 inc)
24 gold beads 3 mm (0.11 inc)
16 gold beads 6 mm (0.24)
76 gold beads 3 mm (0.11 inc)
Come fare: How-to:
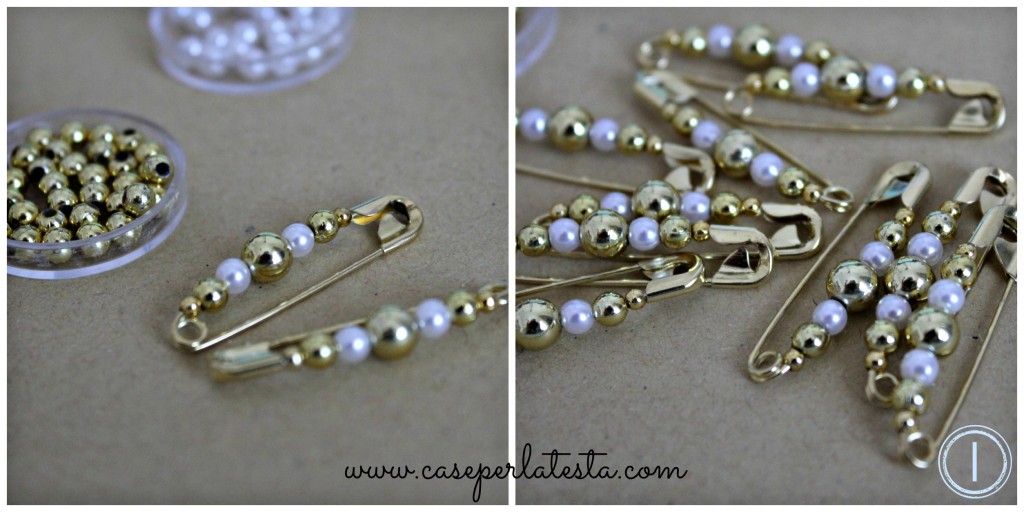
- Infilare in ogni spilla da balia 1 perla oro 3 mm + 1 oro 4 mm + 1 bianca + 1 oro 6 mm + 1 bianca + 1 oro 4 mm + 1 oro 3 mm. Chiudere la spilla e stringere con una pinza la testa della spilla per far si che non si apra.
Tuck into each safety pin 1 gold bead 3 mm + 1 gold 4 mm + 1 white pearl +1 gold 6 mm + 1 white + 1 gold 4 mm + 1 gold 3 mm. Close the pin and tighten with pliers the head of the pin to make sure that doesn’t open.
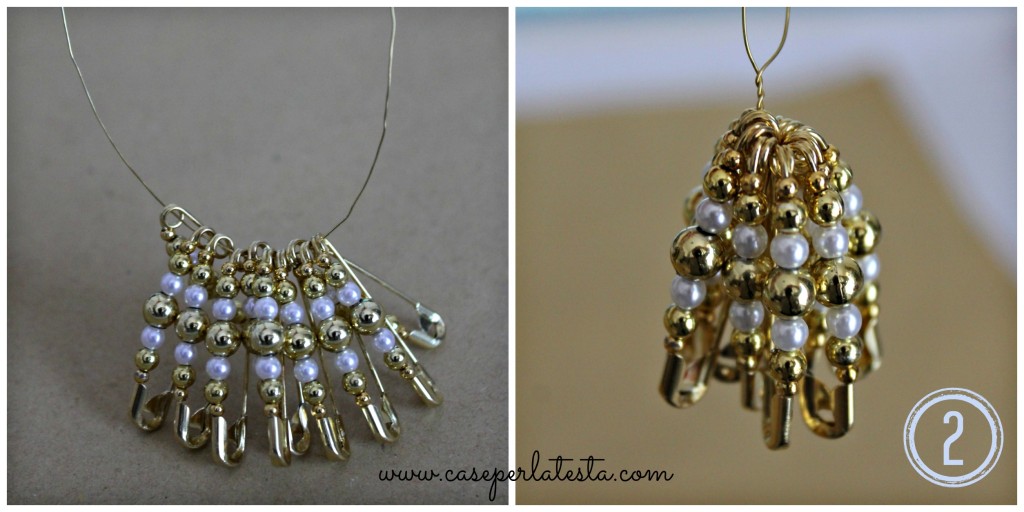
- Tagliare circa 40 cm di filo e infilare le spille da balia di coda tutte dallo stesso lato, portarle a metà del filo, stringerlo e attorcigliarlo in modo da fissarle bene. E così abbiamo fatto il vestitino.
Cut about 40 cm of wire and slide the safety pins to queue all from the same side, bring them to the middle of the wire, tighten and twist in order to fix them well. And so we made the dress.
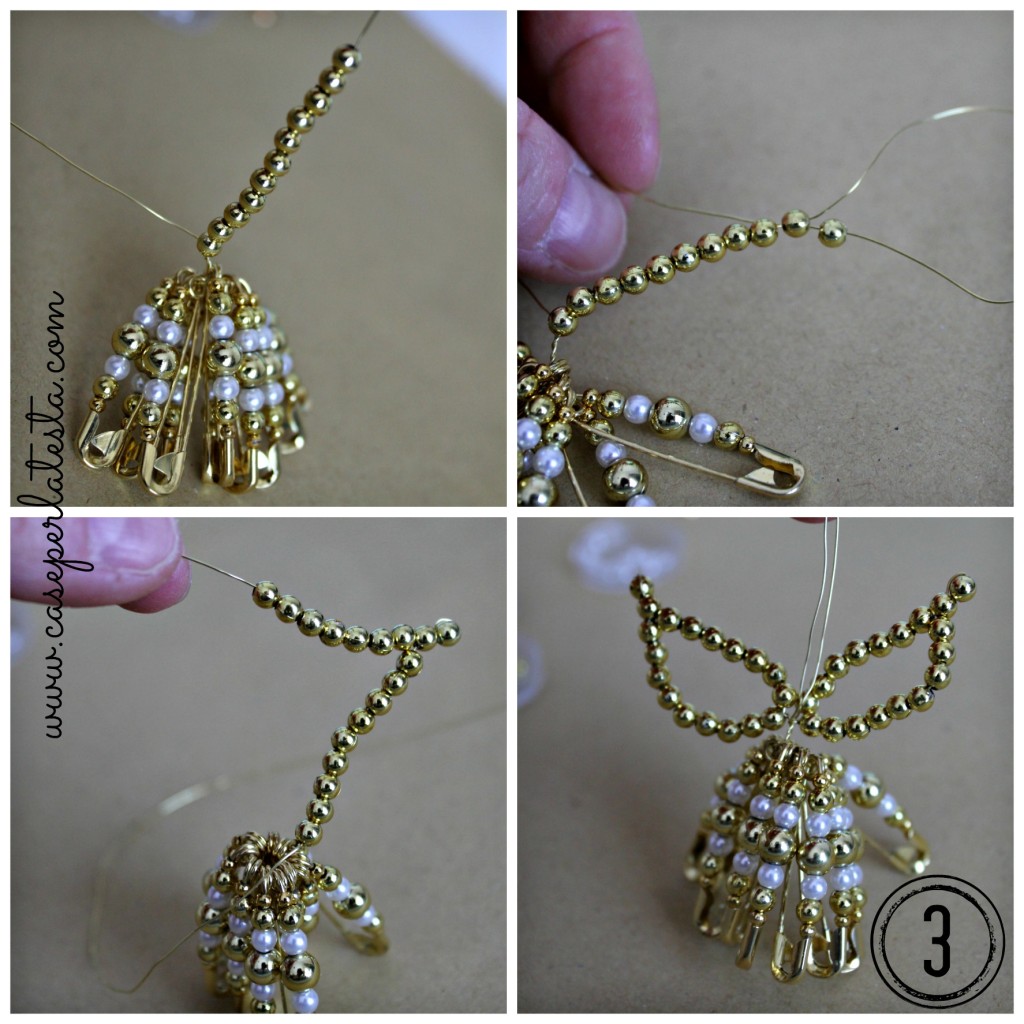
- Formare le ali infilando su ciascun filo separatamente 11 perle oro 4 mm, saltare l’undicesima e ripassare nella decima e tirare forte (oppure attorcigliare su se stessa l’undicesima perlina): così otterremo la punta dell’ala. Poi infilare 7 perle oro 4 mm e chiudere le ali con due giri di filo all’estremità.
Form the wings sticking out of each wire separately 11 gold beads 4 mm, skip the eleventh and repass in the tenth and strong pull (or twist on itself the eleventh bead) so we’ll get the end of the wing. Then tuck 7 gold beads 4 mm and close the wings with two turns of wire at the end.
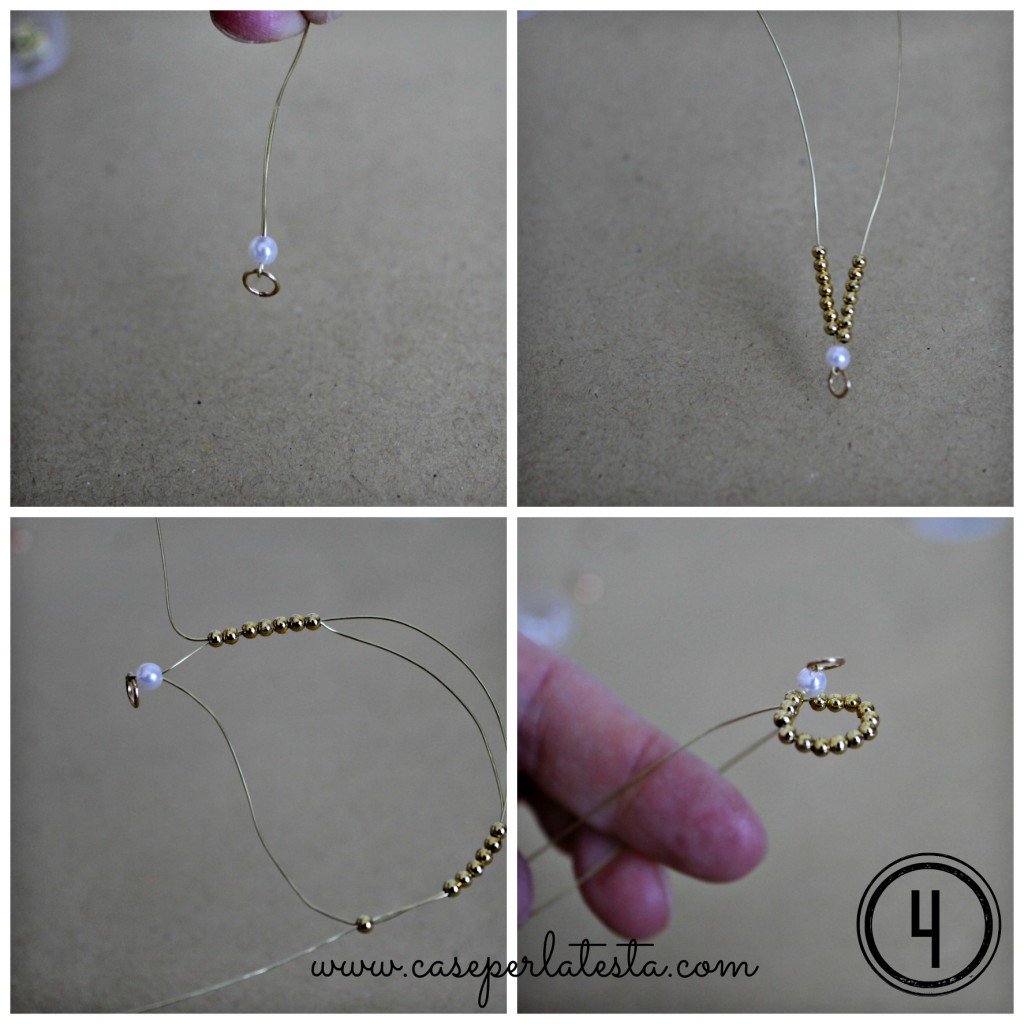
- A metà di circa 50 cm di filo infilare l’anellino d’oro; infilare entrambe i fili in una perla bianca e infilare poi su ciascuna estremità 7 perle oro 3 mm e ripassare dentro le perline incrociandole, così abbiamo fatto l’aureola.
In the middle of about 50 cm of wire, thread the gold ring, put both wires in a white pearl and then put on each end 7 gold beads 3 mm, and wipe inside the beads crossing them, so we make the halo.
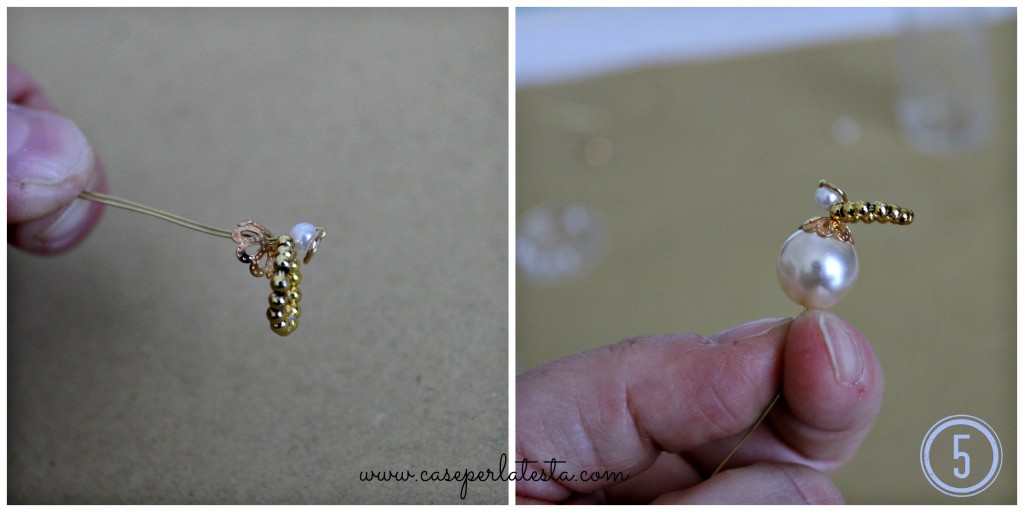
- Riunire i fili e infilarli nel cappellino con il lato convesso verso l’aureola e poi nella perla bianca grande, otteniamo così la testa.
Gather the wires and insert them into the hat with the convex side toward the halo and then in the big white pearl, so we get the head.
- Separare i fili e su ciascuno infilare 1 perla oro 6 mm1 perla bianca 1 oro 6 mm 1 bianca, saltare e ripassare il filo nel buco delle altre 3 (e abbiamo fatto le braccia).
Separate the wires and put on each 1 gold bead 6 mm, 1 white, 1 gold bead 6 mm, 1 white skip and go over the wire into the hole of the other 3 (and we did arms).
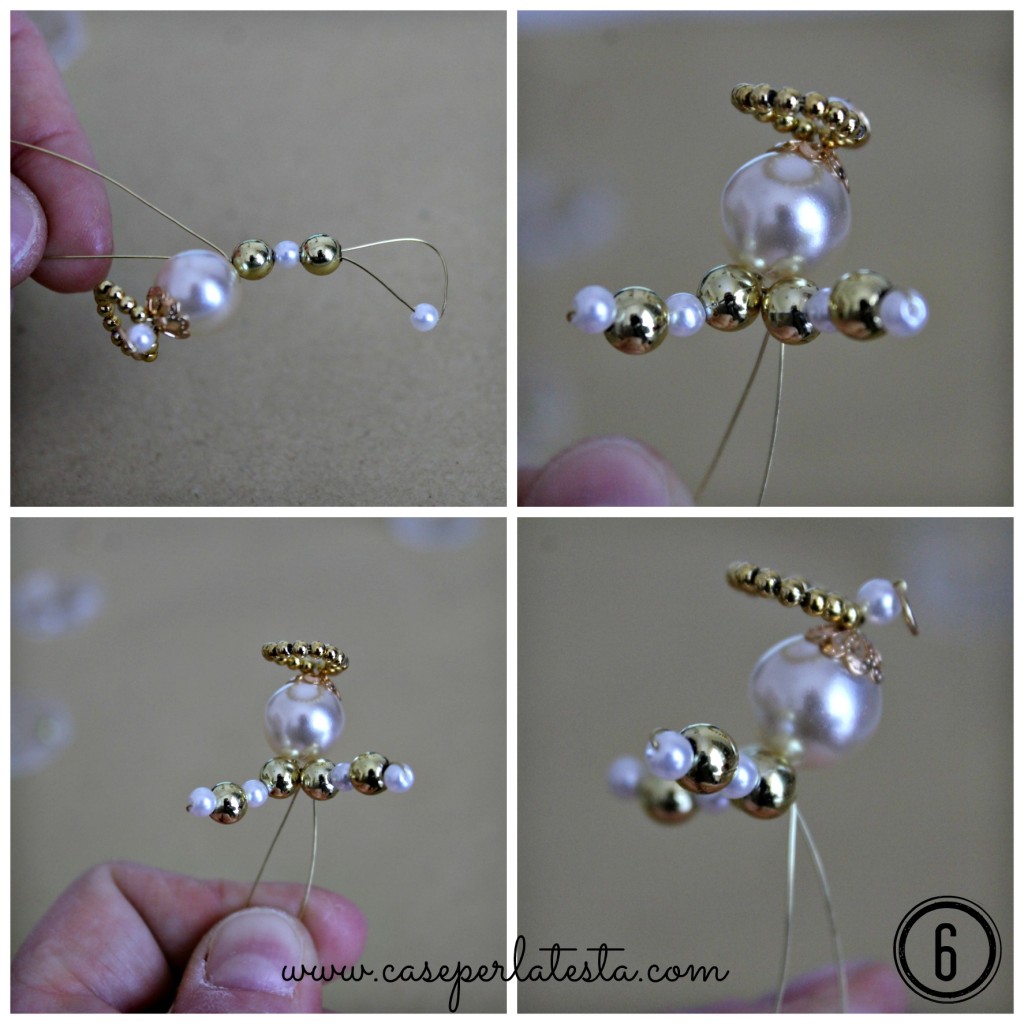
- Infilare su uno dei fili 1 perla bianca e ripassare con l’altro filo nella stessa perla intrecciando tirare forte i 2 fili per fissare.
Put on one of the wires 1 white pearl and wipe with the other wire in the same pearl, pull the 2 wires to secure.
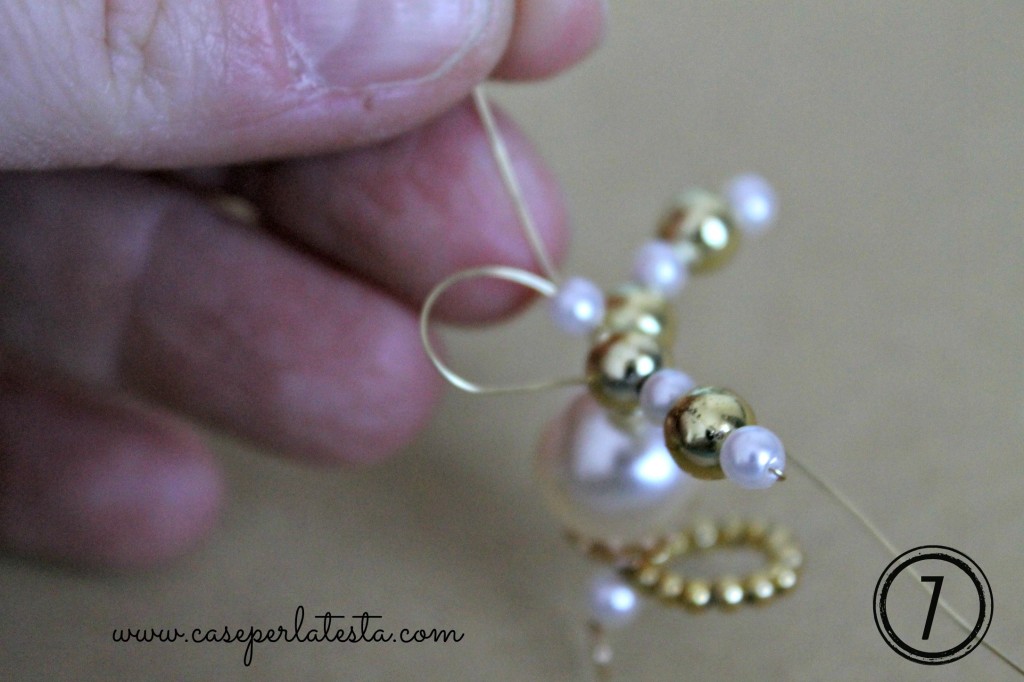
- Infilare entrambe i fili in una perla oro 6 mm e poi nel buco stretto del vestito
Insert both wires into a gold bead 6 mm and then in the hole of the dress.
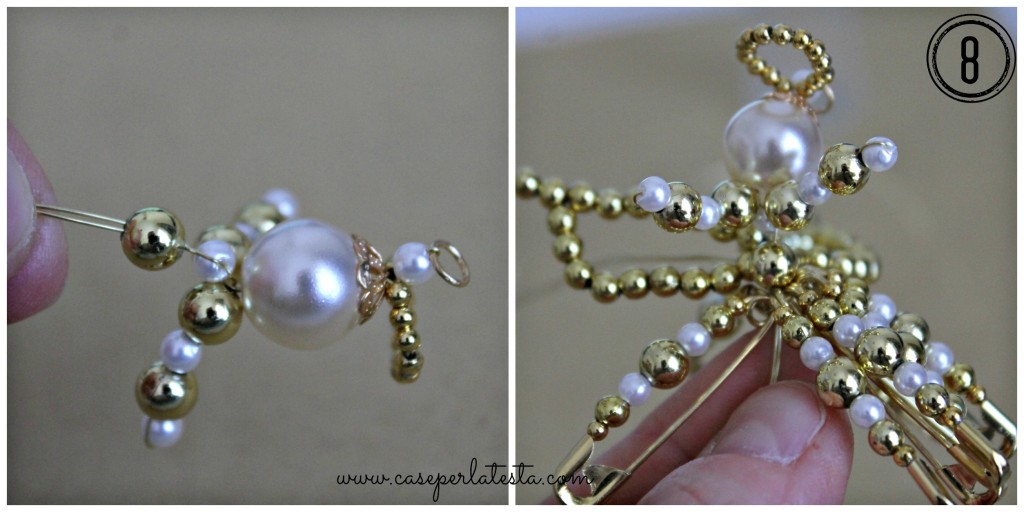
- Infilare su in solo filo 1 perla oro 6 mm, spingerla bene sotto il vestito per fissarla, attorcigliare i fili e tagliare.
Put up in only one wire 1 gold bead 6 mm, push it well under the dress to secure it, twist the wires and cut.
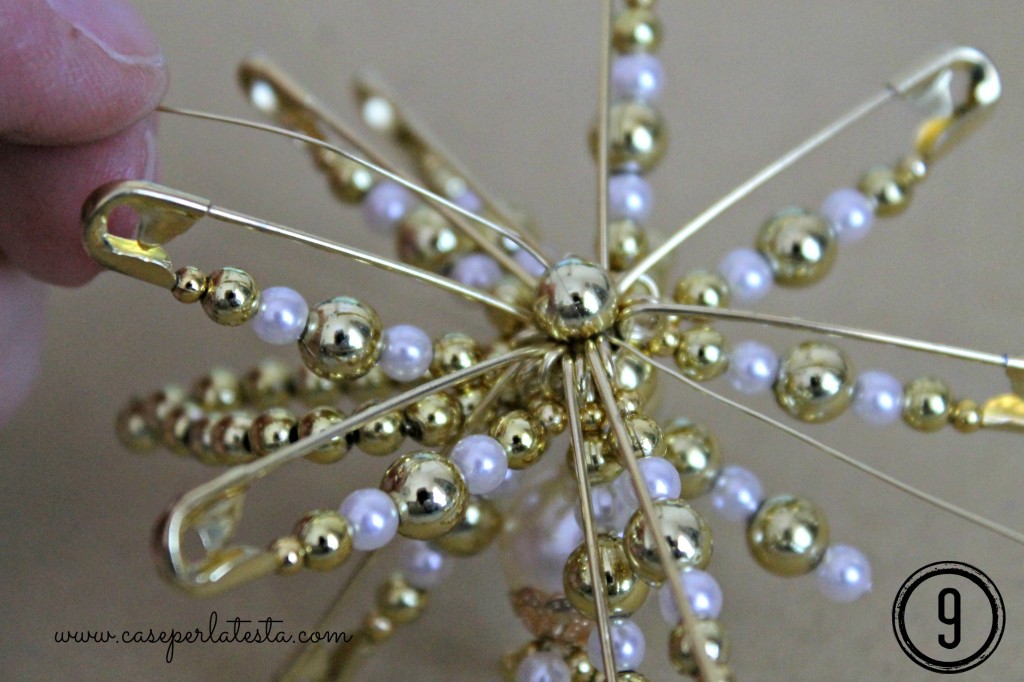
- Tagliare 20 cm di filo e infilare le spille da balia intervallate da 1 perla bianca 1 oro 4 mm 1 perla bianca.
Cut 20 cm of wire and thread safety pins interspersed with 1 white 1 gold 4 mm 1 white.
- Chiudere a cerchio, tirando bene, attorcigliare il filo e tagliarlo. Così abbiamo finito il vestitino.

Close to circle, pulling well, twisting the wire and cut it. So we finished the dress.
Se si vuole mettere un campanellino all’interno dell’angioletto, al punto 9, dopo la perla oro 6 mm, attorcigliare per fissare al vestito e, prima di tagliare, infilare il campanellino, stringere, attorcigliare e tagliare.
If you want to put a bell inside of the little angel in Section 9, after the gold bead 6 mm, twist to secure the dress and before cutting, thread the bell, tighten, twist and cut.
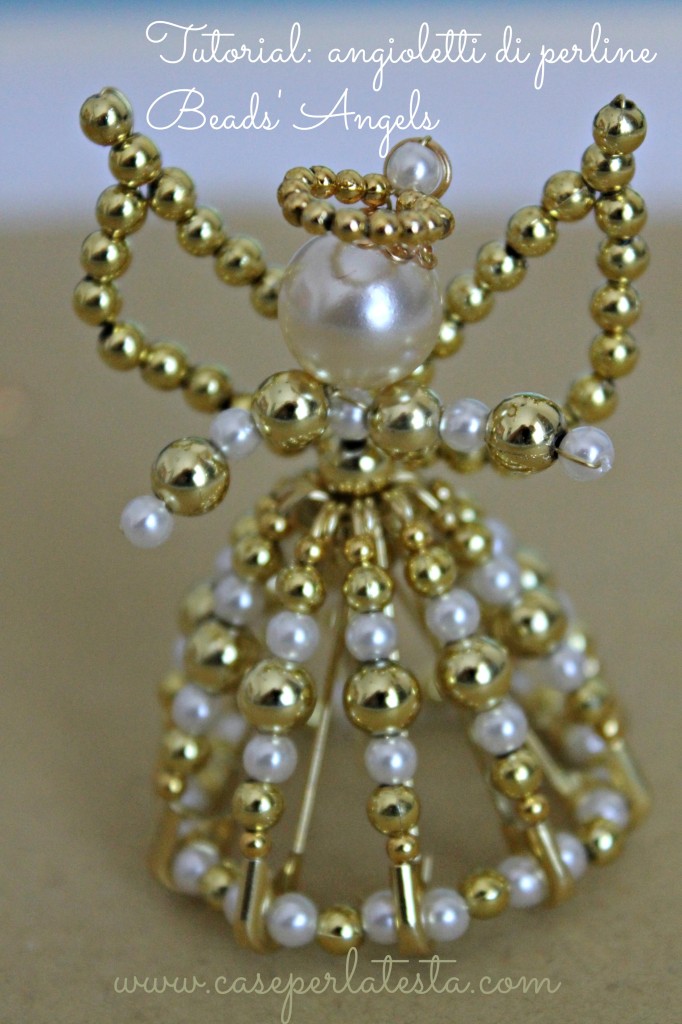 Si possono fare angioletti con tutti i colori, anche con le spille da balia acciaio, ovviamente. Provate a fare gli angioletti di perline, scegliete i vostri colori, è divertente e sono bellissimi! Se ci mandate le foto pubblicheremo le più belle!
You can make angels with all the colors, even with steel safety pins, of course.
Try to make the angels , choose your colors, it’s fun and they are beautiful!
If you send us photos, we will share them!



52 Comments
Norma
Novembre 12, 2013 at 9:14 pmVeramente carini, il tutorial molto chiaro anche per me che non bazzico molto il mondo delle perline.
Complimenti
Ciao
Norma
sandie
Marzo 11, 2017 at 12:05 amhi ladys my question is i dont under stand what cm mean ino in and feet can you help me
with this thank you sandie
Caseperlatesta
Marzo 11, 2017 at 8:01 amHello Sandie,
1 cm is more or less 0,39 inches. Using a converter I wrote in post measures in inch, I hope it helps. please let me know if it’s ok
and send me your beaded angel, I’ll be really very happy to see it! hugs
sandie
Marzo 11, 2017 at 10:33 pmthank you i will try it my problem is the wings i no i put beads on each wire and go through the tenth bead where do i go from there thank you sandie oxoxox
Julie Ann Lee
Novembre 17, 2013 at 7:19 pmThese angels are so beautiful! They would grace any Christmas tree! Thank you for a great tutorial. Julie Ann xx
caseperlatesta
Novembre 17, 2013 at 8:32 pmThank you Julie Ann!
Emanuela @ My Little Inspirations
Novembre 19, 2013 at 10:12 amGrazie per aver partecipato con i tuoi luccicanti angioletti al Soft Inspirations Linky Party!
caseperlatesta
Novembre 19, 2013 at 12:46 pmGrazie Emanuela e complimenti per il tuo sito!
caseperlatesta
Novembre 20, 2013 at 9:09 amGrazie Carla!
se ne fai uno, mi mandi la foto? sono curiosa di vedere se il tutorial funziona o no!
grazie! 😉
Nika vintage
Novembre 22, 2013 at 8:10 amQue buen trabajo!! Un angel precioso y muy navideño!
Saludos!
caseperlatesta
Novembre 22, 2013 at 10:10 amThanks Nika!
I love making them!
LA MESA PINTADA
Novembre 22, 2013 at 10:18 amMuy bonito, me ha encantado vuestra propuesta. Feliz fin de semana.
caseperlatesta
Novembre 22, 2013 at 11:03 amThank you!
have a nice weekend!
Mamy a la obra
Novembre 22, 2013 at 11:53 amAmazing!! Congrats!!
caseperlatesta
Novembre 22, 2013 at 1:00 pmThanks!
Laura
Novembre 22, 2013 at 11:59 amVeramente sono bellissimi!! Y muy fáciles de hacer. ¡Excelente idea! Bacci
caseperlatesta
Novembre 22, 2013 at 1:01 pmGracias Laura! besitos!
Minerva
Novembre 22, 2013 at 12:03 pmHow much creativity! looks like a delicate jewel. Lovely!
caseperlatesta
Novembre 22, 2013 at 1:01 pmThanks Minerva!
they’re also very very easy to do!
Menchu
Novembre 22, 2013 at 12:08 pmUn ángel precioso, muy cuidados todos los detalles, lindo lindo!!
Gracias por el tutorial, besitossss!!
Menchu de Un Pedacito de Luna
caseperlatesta
Novembre 22, 2013 at 1:02 pmHola Menchu! gracias!
Pilar Bazán
Novembre 22, 2013 at 1:17 pmLindos, lindos los ángeles, gran trabajo, gracias por el paso a paso, besos
Leo in the Sky
Novembre 22, 2013 at 1:19 pmWow! How cute! and it looks easy to make 🙂
Daniela
Novembre 22, 2013 at 1:47 pmHola!!! Un gusto conocerte. Tienes un blog muy lindo. Me encantaron esos angelitos dorados. Qué creatividad!!! Gracias por pasarnos el pap.
Qué tengas un hermoso fin de semana!!!
Daniela
Natalie
Novembre 22, 2013 at 4:21 pmGreat tutorial, cute angel 🙂
Thanks for sharing your tutorial on Tutorial Thursdays Linky Party this month. Your Tutorial will be a feature on Tuesday 26th November.
I look forward to seeing you again in the next month’s linky.
x
Natalie
Marigolds’ Loft
caseperlatesta
Novembre 22, 2013 at 4:42 pmWowww! Thanks Thanks! soo proud on being featured by you!
EL desván de los Trastucos
Novembre 22, 2013 at 4:24 pmQué cosa más bonita!!! Precioso.
¡Feliz finde!
caseperlatesta
Novembre 22, 2013 at 4:41 pmgracias!!!!
Matxalen
Novembre 22, 2013 at 4:55 pmEs precioso y no parece muy complicado. Gracias por la idea. Buen fin de semana
Gloria
Novembre 22, 2013 at 6:06 pmSúper glamosrosos los angelitos,Gracias por el paso a paso. Besos Glo
Gladys
Novembre 22, 2013 at 6:32 pmHermoso el ángel. Felicitaciones por tu trabajo!! Besos
Inspiracion House
Victoria
Novembre 23, 2013 at 3:18 amUn hermoso trabajo, felicitaciones! Me encantó como quedaron estos Angeles! gracias por compartir el DIY! Victoria
marcela
Novembre 23, 2013 at 9:02 pmIt turned out so cute, what a great idea to decorate a small Christmas tree!! Thank you por participating this week!
Elena Echavarría Buono
Novembre 24, 2013 at 1:14 amPrecioso trabajo. Muy delicado. Felicitaciones. Saludos, elena
Nené
Novembre 24, 2013 at 7:30 pmSon muy hermosos!!!! Yo le llamo alfileres de gancho a los pernos de seguridad. Lo intentaré. Gracias por el tutorial!!!
ivana
Novembre 26, 2013 at 2:29 amdivino! 😉
caseperlatesta
Novembre 26, 2013 at 7:52 amThanks!
😉
Nancy Ottati
Novembre 28, 2013 at 10:27 pmDelizioso questo angioletto e che bella idea farlo con le spille da balia, complimenti Illy e Kiki!!!!
Buona serata.
Nancy
Marie
Dicembre 4, 2013 at 2:33 pmSo pretty! Pinning so I can make them with the kids during the holidays.
caseperlatesta
Dicembre 5, 2013 at 7:06 amThanks Marie!
I hope you’ll have fun with your kids!
Kiki
Christy L
Dicembre 5, 2013 at 11:45 pmThis is beautiful — thank you for sharing! I’m a new follower and I found you through Artsy Corner Thursday!
http://christyscraftycorner.blogspot.com/2013/12/kissing-ball.html
caseperlatesta
Dicembre 6, 2013 at 6:52 amThanks Christy! and are funny to make too!
Free Webmaster Guide
Gennaio 12, 2014 at 2:56 pmFree Webmaster Guide
Working every day by day I’m a lot more impressed by your post. Thanks for your personal efforts with expressing the following theme.
Decori di Natale: corona di perle fai da te * Christmas decorations: diy pearl wreath | Caseperlatesta
Settembre 15, 2014 at 3:13 pm[…] sotto la vedete sull’albero, insieme a degli angioletti di perline (il tutorial per farli è qui), a palline decorate con cristalli (tutorial qui) e a decorazioni in carta e perle (il tutorial […]
Jozefien
Ottobre 5, 2016 at 2:51 pmGoedemiddag zou ik de beschrijving ook in het Nederlands kunnen krijgen m.v.g Jozefien
Caseperlatesta
Ottobre 5, 2016 at 6:23 pmHallo Jozefien, I’m happy you were able to translate my tutorial. If you have any question don’t hesitate to contact me.
sandie
Marzo 7, 2017 at 11:58 pmi love you angel with beads can you please translate in english i love to have the pattern’
thank you sandie
Lucia
Dicembre 7, 2018 at 6:28 pmBuonasera, vorrei realizzare questi angioletti, dove trovo le spille? Grazie
Caseperlatesta
Dicembre 7, 2018 at 6:41 pmBuonasera, le spille da balia le può trovare nelle mercerie, nei supermercati o negozi all’ingrosso, anche sui banchi del mercato. Grazie a lei
Lucia
Dicembre 9, 2018 at 7:39 pmLo so che i posti sono quelli il punto è che fin’ora ho sempre trovano le spille in mazzetti di varie misure o tutte uguali, ma piccole, come quelle che si trovano sugl’abiti, maglie ecc. Speravo nell’indirizzo, sito dove si rifornisce per averle tutte uguali. Grazie
Caseperlatesta
Dicembre 10, 2018 at 9:54 amCiao Lucia,
le spille da balia le ho prese su Amazon, ci sono confezioni conveninenti da 400 pezzi della misura giusta, circa 4 cm. le trovi qui: https://amzn.to/2C1Iw0q
Spero di esserti stata utile 😉
lucia
Dicembre 10, 2018 at 11:26 amGrazie, si era quello che speravo mi rispodessi, in realtà ho sbagliato io ha formularti la domanda, perchè io sò come le trovo e ti avrei dovuto dire…io le trovo in questo modo tu dove le prendi per averle tutte uguali?…
Va bene alla fine ci siamo arrivate. Grazie per le informazioni e buona Natale.